 RSS Feed
AI Scripts
Preparation
Create the directory for your .u2s scripts as explained in this tutorial. We will call this one "u2stutorial". Download the level used for this tutorial. It is a simple room with 4 PathNodes, a PlayerStart, a Light and a light marine. The level's MapName is "u2stutorial", which matches the new directory. The map also includes a trigger for later experiments.
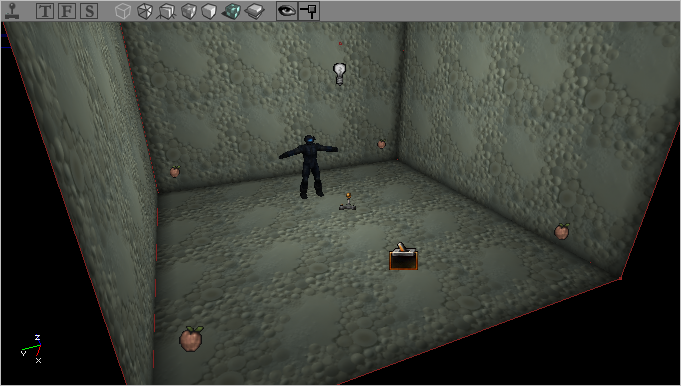
Play the level. The marine is walking around randomly. As he doesn't have an AI script yet, he defaults to the autonomous AI and wanders around. In this condition, the underlying AI code takes control of the Pawn and he reacts to all surrounding stimuli (seeing or hearing an enemy, etc.).
Create an empty text file and save it as "marine01.u2s" in your /Scripts/u2stutorial directory. This is the AI script the marine will use. Make sure your text editor does not automatically append a .txt extension to it.
In the marine's properties, open the AI tab and look for the CommandFileName slot. Enter "marine01" (without any extension) and save the map. This tells the game to use this file to control the Pawn.
Simple Patrol
Add the following lines to the "marine01.u2s" file and save it:
sleep 2
gotoactor PathNode0
gotoactor PathNode1
sleep 2
gotoactor PathNode2
agentcall Event_U_Wave 1
gotoactor PathNode3
sleep
When the level is played, the marine stands still for 2 seconds, then runs to PathNode0 then PathNode1, where he waits for another 2 seconds, then to PathNode2, where he plays the animation "Event_U_Wave". Finally, he runs to PathNode3 where he stops and waits indefinitely.
Here is a detailed review of the commands used in this example. Parameters in "()" brackets are required, parameters in "[]" brackets are optional:
- sleep [time]: The NPC waits for the given time (in seconds). If no time is given, the NPC will wait forever, until an incoming event wakes him up.
- gotoactor (actor): The NPC moves to the specified actor. This parameter uses the actor's object name (found in its properties under Object → Name), not its Tag. Notice that "gotoactor" is a latent command, which means the script stops executing until the command has been finished (in this case, the script won't continue until the specified destination has been reached).
- agentcall (action name) (0/1): Plays an agent action, which you can treat as an animation for now (more on agents at the Golem University). 1 means the "agentcall" is latent (meaning that the NPC won't execute the next command until he has finished his animation), 0 means the command is not latent and the NPC immediately processes the next .u2s command. You can see the difference if you update your script to "agentcall Event_U_Wave 0" and play the level again: the marine will now start waving and continue running (as he executes the next "gotoactor" command, following the agentcall).
All commands must be written in lowercase but other elements, such as actor names (like PathNode0, in our example) are case insensitive.
Labels
Labels are arbitrarily titled sections of a script. They are defined by the ":" character and their name can contain only letters, numbers and the "_" character. A label be jumped to with the "gotolabel" command. This allows, among other things, the creation of looping sequences of actions.
Add two more lines to the beginning and end of your script and delete the final "sleep" statement:
:MarinePatrol
sleep 2
gotoactor PathNode0
gotoactor PathNode1
sleep 2
gotoactor PathNode2
agentcall Event_U_Wave 1
gotoactor PathNode3
gotolabel MarinePatrol
Play the level and see what happens.
You can also use the "call" command to "insert" the label's commands in the middle of another script. When a call is encountered, the current script pauses, executes all the commands of the labeled section and resumes its course once a "return" command has been found:
:WaitABit
sleep 5
call PatrolThisArea
sleep 3
gotolabel WaitABit:PatrolThisArea
gotoactor PathNode0
gotoactor PathNode1
return
In this example, the NPC waits for 5 seconds, then (with "call PatrolThisArea"), goes to PathNode0 and PathNode1, then, as it finds a "return" command, goes back to the WaitABit script: the Pawn waits for 3 seconds and starts all over.
Messages and Debugging
To see how your script is executing in real-time, you can print messages in the console, provided it has been enabled first.
Modify your script again so that it looks like this:
:MarinePatrol
message "sleeping 2 seconds"
sleep 2
message "going to pathnode 0, then PathNode1"
gotoactor PathNode0
gotoactor PathNode1
message "sleeping 2 seconds"
sleep 2
message "going to pathnode 2"
gotoactor PathNode2
message "waving!"
agentcall Event_U_Wave 1
gotoactor PathNode3
message "starting over"
gotolabel MarinePatrol
When the level is played, the script prints a note announcing what the marine is about to do.
The game's debug mode is a better way to make sure the script is working as intended without printing messages by hand. When "debugmode 11" is inserted at the very beginning of the script, before the :MarinePatrol label, the game writes down everything the script is doing (except Events).
Main Commands
The following are the other main commands:
- turntoactor (actor): The NPC turns towards a given actor (using its object name, not its Tag).
- fire (duration): The NPC uses his primary fire mode for X seconds.
- firealt (duration): The NPC use his secondary fire mode for X seconds.
- setmovespeed: Modifies the NPC's movement speed.
Here is an example of how they can be used:
:MarinePatrol
sleep 2
gotoactor PathNode0
turntoactor Light0 // The marine turns towards the Light
fire 2 // The marine shoots at the Light for two seconds
firealt 2 // The marine repeats with his alt-fire
gotoactor PathNode1
sleep 2
setmovespeed 0.5 // The marine will now move at half-speed
gotoactor PathNode2
setmovespeed 1 // The marine reverts to his original speed
agentcall Event_U_Wave 1
gotoactor PathNode3
gotolabel MarinePatrol
Events
Events are an important tool for scripting AI behaviour. There's already a Trigger in the test level, which sends the Event "ChangeMarinePatrol". By default, it does not affect NPCs: in the Trigger's property, bTriggerNPCs (in the Trigger tab) has to be set to true. The marine will react to the Trigger once a hook as been added to the script with the "ontrigger" command.
- ontrigger (Event) gotolabel (label): Jump to the named label when the NPC receives the Event. The same Event can be used in another label with another "ontrigger" command to jump to yet another label. This means a single Event can have the NPC switch between several patterns.
Consider the following script:
:MarinePatrol
ontrigger ChangeMarinePatrol gotolabel MarinePatrol2
gotoactor PathNode0
gotoactor PathNode1
sleep 2
gotolabel MarinePatrol:MarinePatrol2
ontrigger ChangeMarinePatrol gotolabel MarinePatrol
gotoactor PathNode2
gotoactor PathNode3
sleep 2
gotolabel MarinePatrol2
When the map is played, the marine loops through the MarinePatrol label until he receives the "ChangeMarinePatrol" Event from the level, at which point he goes through the MarinePatrol2 part of the script and plays it in a loop. If he is triggered again, he reverts to the first behaviour.
Random Decisions
Randomness can be added with the "testrandom" command. It makes the script select a random number between 0 and 1 and considers the test a success if this number is greater than (or equal to) the value used as argument:
testrandom 0.5 gotolabel Outcome1
gotolabel Outcome2:Outcome1
[...]:Outcome2
[...]
In this example, if the randomly created number is superior or equal to 0.5, the script jumps to the Outcome1 label. Otherwise, the script continues with the next command and encounters the line "gotolabel Outcome2" and jumps to the Outcome2 label.
While any command can be used after a failed "testrandom" command, using a "gotolabel" to jump to an appropriate section is good practice as it makes reading the script easier.
If the script needs to randomly branch into more than two outcomes, the "testrandom" command can be stacked:
testrandom 0.66 gotolabel Outcome1
testrandom 0.66 gotolabel Outcome2
gotolabel Outcome3
This script as a 33% chance to jump to Outcome1. If this test fails, it has a 33% chance of going to Outcome2. If both tests fail, the script goes to Outcome3.
You can also call labels with "testrandom":
testrandom 0.5 call Outcome1
gotoactor PathNode3
[...]:Outcome1
gotoactor PathNode1
return
In this example there's a 50% chance the script will jump to the Outcome1 label (and walk to PathNode1), then will return (and walk to PathNode3). In the other 50%, the marine will directly go to PathNode3, skipping the Outcome1 label.
Random Encounters With "setlocation"
The "setlocation" command lets you teleport a Pawn to any given point in the map. Using "setlocation PathNode11" will instantly move the Pawn controlled by the script to PathNode11. This command is very handy to randomly place enemies.
For exemple, if the player can access three rooms and needs to encounter an enemy Skaarj, the location of that opponent can be randomized:
testrandom 0.66 gotolabel TeleportToRoom1
testrandom 0.66 gotolabel TeleportToRoom2
setlocation PathNode3 // Pathnode located in room #3
sleep:TeleportToRoom1
setlocation PathNode1 // Pathnode located in room #1
sleep:TeleportToRoom2
setlocation PathNode2 // Pathnode located in room #2
sleep
The engine does not check for visibility when teleporting the Pawn and the Skaarj will spawn out of thin air, which means the move must be performed before the player can see the destination Pathnode. If a visibility test has to be made, a PawnFactory is a better choice than a "setlocation" command (the PawnFactory itself can actually be controlled by a script).
Dynamic Search
The "findactor" command is a powerful tool which checks for any given actor in a specified radius while the game is running. It features a lof ot parameters:
findactor [TargetName [Min [Max [DistanceType [VisibilityType [Num [gotolabel/call targetlabel]]]]]]]
The "[]" brackets mean that a parameter is optional, so we don't need to use all of them most of the time. A simple application of "findactor" looks like this:
findactor engine.pathnode 32 1024 1
gotoactor found
This makes the Pawn perform a radius check for any PathNode, starting at 32 world units and stopping at 1024 units. If one is found, the Pawn walks up to it. The last parameter (1) means only the closest PathNode found is picked if the search detects more than one. The result is cached in an internal variable, found.
The "findactor" command can be used, for example, to create a scared scientist who follows the player but runs away at any sign of danger and cowers at the closest hiding spot (these spots would be preset with ShadowNodes in the right places).
:FollowPlayer
onevent SeeEnemy gotolabel CheckForHiding
gotoactor Player 128 // Follow the player with a radius of 128 units
sleep 3
gotolabel FollowPlayer // In case we ever reach the player, wait 3 seconds and start over:CheckForHiding
findactor U2AI.ShadowNode 0 2048 1 gotolabel Hide // Jump to Hide label if ShadowNode is found
message "No hiding spot found, continue script" // No suitable actor found in a 2048 radius
sleep 1
gotolabel FollowPlayer:Hide
gotoactor found 64 // Get within 64 units of found ShadowNode
findactor // Clear found spot
setstance crouching
onevent SeePlayer gotolabel FollowPlayer
This command has more parameters than the ones seen previously.
- TargetName: Name of the desired actor class to look for.
- Min: The minimal radius to check around the actor controlled by this script.
- Max: Maximum radius. If this is not set, the entire level is checked.
- DistanceType: This allows matching the first actor found (0), the closest one (1), the furthest one in the radius (2) or even all matching actors in the checked area (3).
- VisibilityType: If this parameter is 0, no visibility check is done. By setting this to 1, the script matches targeted actors in the radius if there is no obstacle between them and the Pawn. If set to 2, the game will try its best to match actors in the Pawn's actual field of view.
- Num: Number of actors to be cached.
As seen in the previous script, using the "findactor" command alone without any parameter clears the found variable.
Here are example combinations:
findactor u2.alarmtrigger 0.0 4096.0 0 0 0 gotolabel useit // Match first within 4K units, no visibilitytest
findactor u2.alarmtrigger 0.0 4096.0 1 0 0 gotolabel useit // Match closest within 4K units, no visibility test
findactor u2.alarmtrigger 0.0 4096.0 2 0 0 gotolabel useit // Match furthest within 4K units, no visibility test
findactor u2.alarmtrigger 0.0 4096.0 3 0 2 gotolabel useit // Match all within 4K units, no visibility test, max 2
findactor u2.alarmtrigger 0.0 0.0 2 0 0 gotolabel useit // Match furthest, no visibility test
findactor u2.alarmtrigger 0.0 0.0 2 1 0 gotolabel useit // Match furthest, must be visible
There are many other commands and even internal Events the game triggers when NPCs detect other characters or interact with them. A complete overview of Unreal 2's scripting system can be found in Legend Entertainement's old documents, especially the file AIScripting.doc, so be sure to download and read these.