 RSS Feed
Dialogs
Preparation
Create the directory for your .dlg scripts as explained in this tutorial. We will call this one "dlgtutorial". Download the level used for this tutorial. It is a simple room with Aida standing inside. There is a closed door behind her which cannot be opened. Aida is using inert.u2s, one of the default scripts in the game. It prevents her from wandering around.
Create an empty text file and save it as aidadialog.dlg in your /Dialog/dlgtutorial directory. Make sure your text editor does not automatically append a .txt extension to it. This file will contain our dialog. In UnrealEd, open the level properties by pressing F6 or clicking View → Level Properties. Under LevelInfo, make sure the MapName field matches the name of the dialog folder: dlgtutorial.
The dialog system identifies speakers using an identifier set in the Pawn's properties. Select Aida and, in her properties, open the Dialog tab. Enter "Aida" in the Speaker slot. Unreal 2 will try to match this name against the dialog files.
A dialog can be a complicated tree with many diverging branches. A flowchart is helpful to keep track of available dialog lines and topics. In our case, the dialog will be a simple choice asking Aida to open the door.
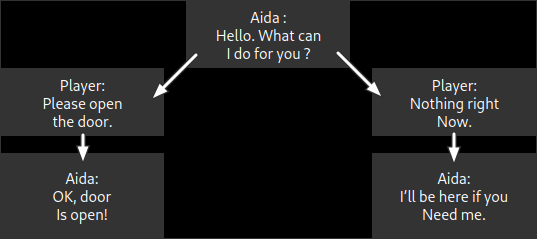
When addressed, Aida will ask the player what she can do for him. The player can ask her to open the door. She will reply "Okay, door is open!" and the door will be triggered open. If the player declines, she will say "I'll be here if you need me."
First Dialog Nodes
A conversation is defined by dialog nodes. Each node contains a single line and its parameters such as who is the speaker, what are the next available topics, which sound file contains the voice recording, etc. Let's create the first dialog node of Aida greeting the player. Open aidadialog.dlg, which is currently empty, and add the following lines:
[AidaDialog]
Speaker=Aida
LongText=Hello. What can I do for you?
With that, you have created a functional dialog node, even though you won't be able to speak to Aida just yet. Let's review the lines:
- [AidaDialog]: This is the title of the dialog node, enclosed by "[]" characters. Everything following the title (until the parser finds a new "[") is treated as part of the same dialog node.
- Speaker: Who this node belongs to. In our case, that's Aida. This line is matched against the Speaker property of each Pawn in the level. There is one hardcoded Speaker: "Player", which always means the player character.
- LongText: The written subtitle for this dialog line. If you talk to Aida, this is the sentence the game will display at the bottom of the screen.
To make an actual conversation possible, add a few more lines to the .dlg file.
[AidaDialog]
Speaker=Aida
LongText=Hello. What can I do for you?
NextNode=AidaDialogA[AidaDialogA]
Speaker=Player
ShortText=Open door
LongText=Please open the door.
When playing the level, you should now get a "use" reticule around Aida and be able to talk to her. Let's look at the additional commands we used:
- NextNode: The next node in the conversation. If the speaker of that node is not "Player", the node will happen automatically. If the speaker of that node is "Player", the dialog system uses those nodes as dialog options, displaying the ShortText as choices. When the player picks one, the LongText gets displayed as a subtitle for the player's line.
- ShortText: Abbreviated text displayed on screen as a dialog option. This is only useful if the speaker of the node is the player. This is usually a very condensed version of the LongText line or the main topic of the node the player can select.
Conversations
You just created a working dialog file and you can now talk to Aida. But how and where did you specify the active conversation or tell Aida about her dialog file? The answer is simple: you didn't and you don't have to. When a level is loaded and a dialog folder with a matching name exists, Unreal 2 automatically scans all .dlg files inside and caches the available conversations. These are immediately made available in-game. When you try to talk to somebody, the game looks for a valid conversation between you and the NPC (using the Speaker strings). If one such conversation exists, that dialog is chosen.
This means the game has to decide on one conversation if multiple active topics are available. The conversation Unreal 2 chooses at random might not be the one you want. Right now, this is irrelevant as there is only one active topic.
The current example is very simple: the .dlg contains a single two-nodes conversation between the player and Aida. The game knows exactly where the dialog has to begin (the first node of the .dlg file), so the level works. Because most levels will have multiple conversations available, we need to tell the game what are the different topics the player and NPCs can discuss. This is achieved with the [Root] node.
Add two lines to aidadialog.dlg so that it looks like this:
[Root]
Conversation=AidaDialog[AidaDialog]
Speaker=Aida
LongText=Hello. What can I do for you?
NextNode=AidaDialogA[AidaDialogA]
Speaker=Player
ShortText=Open door
LongText=Please open the door.
This makes the game aware there is a conversation topic starting with the [AidaDialog] node. As you add additional topics for Aida and the player, add additional Conversation lines at the top, in the [Root] node. Check out any of the .dlg files in the Atlantis folders to see how multiple topics are handled.
Finalizing
In its current state, the .dlg file only contains two nodes of the flowchart. To complete the full conversation, the dialog should look like the following:
[Root]
Conversation=AidaDialog[AidaDialog]
Speaker=Aida
LongText=Hello. What can I do for you?
NextNode=AidaDialogA
NextNode=AidaDialogB[AidaDialogA]
Speaker=Player
ShortText=Open door
LongText=Please open the door.
NextNode=AidaDialog1[AidaDialogB]
Speaker=Player
ShortText=Nothing
LongText=Nothing right now.
NextNode=AidaDialog2[AidaDialog1]
Speaker=Aida
LongText=Okay, door is open!
// End[AidaDialog2]
Speaker=Aida
LongText=I'll be here if you need me.
// End
The complete file is still very straightforward: Aida greets the player and gives the player two choices. Because the [AidaDialog] node has two NextNode lines, both leading to player nodes, the game will show both nodes on the screen, displaying the ShortText strings as dialog options. Each node, when chosen by the player, then leads to the appropriate reply from Aida.
Events
Aida may agree to open the door for you, but nothing happens. There are two ways to send Events from dialog nodes: Event and ExitEvent.
- Event: Sends the Event after a certain amount of time, expressed as a percentage of this node's duration. If no percentage is given, this defaults to 0. If a line read only "Event=ExampleName", the Event "ExampleName" will be triggered as the node starts. "Event=ExampleName,,50" (with two commas) sends the Event after 50% of the node's duration.
High percentages are not reliable and might get overlooked, especially when the framerate is low. Thus, "Event=ExampleName,,99" is not guaranteed to happen. However, anything under 90 is largely safe. - ExitEvent: Sends the Event when the entire conversation is over. When the dialog encounters an ExitEvent line, it caches the Event and triggers it when the last node of the dialog has finished. ExitEvent is reliable and can be used when an Event definitely has to happen.
Let's add the Event to open the door to our Aida dialog:
[AidaDialog1]
Speaker=Aida
LongText=Okay, door is open!
ExitEvent=Door
// End
The ExitEvent can also be added to the [AidaDialogA] node, when the player picks the positive answer. Because ExitEvents occur at the end of a conversation, not at the end of a dialog node, any node after the choice will trigger the door as intended.
SpokenMax
After the conversation with Aida is over, the reticule no longer appears. If the player has declined Aida's help, there is no way to start over and ask her to open the door.
Each dialog node has an internal counter which tells the game how many times it can happen, and that counter defaults to 1. Once a node has been spoken enough times, it is deleted from the game. Without these deleted nodes, the game cannot find a valid dialog between the player and Aida and no further discussion can be initiated with her. To increase the number of times the conversation can happen, you have to use the SpokenMax parameter.
[Root]
Conversation=AidaDialog[AidaDialog]
Speaker=Aida
SpokenMax=5 // This dialog can happens 5 times
LongText=Hello. What can I do for you?
NextNode=AidaDialogA
NextNode=AidaDialogB
SpokenMax sets how many times a dialog node can happen. To make a node happen indefinitely, use SpokenMax=0.
Enabling and Disabling Nodes
If SpokenMax=0 has been added to all nodes, the player will face the odd situation where the door has been opened by Aida and the "Open door" choice no longer makes any sense (the door is set to TriggerOnce and will stay open forever) but still gets displayed. This can be fixed by disabling "Open door" once Aida has completed its task.
Modify the [AidaDialog1] node as follows:
[AidaDialog1]
Speaker=Aida
SpokenMax=0
LongText=Okay, door is open!
ExitEvent=Door
DisableNode=AidaDialogA // Disable the option to open the door
// End
At this point, if the player talks to Aida and uses the "Nothing" option first, he can talk to her again and pick "Open Door". Afterwards, the "Open door" node, [AidaDialogA], is disabled and the player can only choose "Nothing".
This can also be achieved without disabling the node: set all but the "Open door" node to SpokenMax=0. "Open door" will use the default counter and only be available once, before being removed from the available dialog options. When the conversation with Aida happens again, only the "Nothing" choice will be available.
DisableNode has a counterpart: EnableNode. It can be used to reactivate disabled nodes. All nodes are enabled by default but can be disabled manually by adding the line Enabled=false to the dialog node.
Dialogs and Scripts
The dialoginitiate command lets an NPC initiate a dialog with the player.
Dialoginitiate [SpeakerToTalkTo] (DialogNode) makes the NPC initiate dialog with SpeakerToTalkTo. If SpeakerToTalkTo isn't set, the game will assume the character is addressing the player.
Nodes can also be enabled and disabled from the .u2s script:
dialogenable (DialogNode)
dialogdisable (DialogNode)
Other Options
One aspect not covered by this tutorial is the use of the SoundFile command. It is pretty self-explanatory and can be understood by looking at the game's existing .dlg files which include voice recordings. SoundFile can reference .ogg files (in the /Voice directory) or .wav files (in .uax files in /Sounds).
Many options can be set in a node, but this tutorial only covers the basics.
If an NPC has more than one topic (set in the [Root] node with the Conversation line), you should keep all but one conversation disabled at all times. Otherwise, the game picks one conversation topic at random when a dialog is initiated. Disable the first node of all conversations you don't want active at that point in the game and enable them later through .u2s scripts.
Invisible Narrator
An invisible narrator is made by creating a dialog between the player and himself, initiated by triggering an invisible speaker.
Create a new dialog file for the cutscene narration with a simple chain of dialog nodes connected to each other, with Speaker always set to Player. For each node, using the HideChoices=true parameter will make the player's dialog play automatically instead of asking for user input before every node.
If audio files are used for the dialog, each SoundFile line should end with ",Player". This plays the audio recording at full volume, no matter how far away the speakers are.
Create a new .u2s script with the command "dialogfar" and two arguments: the name of the conversation topic of your narration and the person being addressed: player.
Place a LevelMaster in your map (Pawn LicenseePawn → U2Pawn → U2PawnBase → LevelMaster). This actor will be used to trigger the fake conversation. In its properties, target the .u2s script in AI → CommandFileName.
In the game, trigger the LevelMaster to initiate dialog.
A perfect example is the CS_Outro map, which contains the final scene of the game. The LevelMaster's CommandFileName is CS_OutroDialog. The CS_OutroDialog.u2s file contains this line:
dialogfar DorianGray_04_002 player
The dialog file for the map contains the whole narration as a single conversation and begins with:
[Root]
Conversation=DorianGray_04_002