 RSS Feed
UnrealEd Key Binding
Note: This article was written before the new C++ UnrealEd (2.0-3.0) was released. Some of the following may not apply anymore. A lot still does, though.
Basic Key Binding
You can rebind all of Unreal's keys by either editing User.ini with a text editor or through the Advanced Options menu in UnrealEd (Advanced → Raw Key Bindings). What you might not know, however, is that you can bind multiple commands to the same key by separating each command with the "|" (pipe) character (Alt + 124). What you might also not know is that you can take almost every command UnrealEd executes and bind it to a key. This way, you can make shortcuts for almost all the UnrealEd commands you would usually access through the menu.
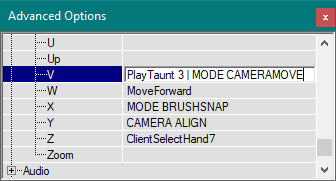
Let's take the Camera Movement mode for example (the first icon in the toolbar): the internal UnrealEd command for selecting this function is "MODE CAMERAMOVE". To bind this command to a key, open the advanced options, go to the Raw Key Bindings section and assign "MODE CAMERAMOVE" to the key you want to use. If you already have a command assigned to it, separate both commands with "|". As mentioned, you can create such binds for pretty much everything UnrealEd.
To discover the internal UnrealEd commands for the functions you want to bind, open the UnrealEd log window (under Window → Log) and perform an action. The log window will show the internal UnrealEd command.
The option to open the log was moved to View → Log in UnrealEd 2.0 and 3.0. There is also an icon at the bottom of UnrealEd's window, next to the Command field, which opens it.
There are two rules to keep in mind. First, you cannot rebind Ctrl + key combinations, as those are hardcoded in the editor.
Second, the 1, 2 and 3 keys are automatically bound to "MODE SPEED 1/4/16", which change the camera movement speed. There is no way to remove these. Binding something to the first 3 number keys will work but will also change your camera speed.
You should also avoid rebinding a key that already has a Ctrl + key combo assigned to it, as UnrealEd will not distinguish between you pressing Ctrl or not and will execute both commands. Assigning, for example, "MAP SETBRUSH CLEARFLAGS=40 SETFLAGS=32" (which makes selected brushes semi-solids) to the "W" key and using Ctrl + W to duplicate a brush will automatically make the copy semi-solid.
There is no limit to how many commands you can assign to each key. Binding an in-editor command and an in-game one to the same key does not cause any conflict.
Binding Examples
Here is a list of all shortcuts I use in UnrealEd, with a short explanation of what each one does. There are many more functions you might want to bind to a key, this list is not a complete reference.
Grid Spacing
- 1=MAP GRID X=1 Y=1 Z=1 : Change grid spacing to 1.
- 2=MAP GRID X=2 Y=2 Z=2 : Change grid spacing to 2.
- 3=MAP GRID X=4 Y=4 Z=4 : Change grid spacing to 4.
- 4=MAP GRID X=8 Y=8 Z=8 : Change grid spacing to 8.
- 5=MAP GRID X=16 Y=16 Z=16 : Change grid spacing to 16.
- 6=MAP GRID X=32 Y=32 Z=32 : Change grid spacing to 32.
- 7=MAP GRID X=64 Y=64 Z=64 : Change grid spacing to 64.
- 8=MAP GRID X=0.5 Y=0.5 Z=0.5 : Change grid spacing to 0.5 (this actually works).
Brush Order
- 9=MAP SENDTO FIRST : Set brush to first.
- 0=MAP SENDTO LAST : Set brush to last.
These two commandes are equivalent to selecting Order → To First or To Last in the context menu after right-clicking a brush.
Modes
- Space=MODE SPEED=4 : Reset the camera speed to medium.
- V=MODE CAMERAMOVE : Switch mode to normal camera.
- X=MODE BRUSHSNAP : Switch mode to Snaped Brush Stretching.
- F=MODE TEXTUREPAN : Switch mode to Pan Texture tool.
- G=MODE TEXTUREROTATE : Switch mode to Rotate Texture tool.
Brush Transformations
- U=POLY TEXMULT UU=0 VV=0 UV=-1 VU=1 : Rotate the texture 90 degrees on selected surfaces.
- E=MAP SETBRUSH CLEARFLAGS=40 SETFLAGS=32 : Make selected brushes semi-solid.
- Q=MAP SETBRUSH CLEARFLAGS=40 SETFLAGS=0 : Make selected brushes solid.
- J=ACTOR MIRROR X=-1 : Flip selected brushes on the X axis.
- K=ACTOR MIRROR Y=-1 : Flip selected brushes on the Y axis.
- L=ACTOR MIRROR Z=-1 : Flip selected brushes on the Z axis.
- T=ACTOR APPLYTRANSFORM : "Transform Permanently" command.
- Y=CAMERA ALIGN : Center all cameras on selected actor.
- I=MAP BRUSH GET : Give the red builder brush the shape of the selected brush (equivalent to Polygons → To Brush).
If a description is too cryptic and you do not understand what the command does, bind it to a free key and try it out.